
How to Remove Grease From Kitchen Cabinets (Methods That Actually Work)
If you’ve ever run your hand along the top of your kitchen cabinet doors and felt that unmistakable sticky film, you already know the problem. Learning how to remove grease from kitchen cabinets is one of those tasks that nobody loves but everyone eventually faces — and it’s more urgent than most people realize. That slick, yellowish buildup isn’t just unsightly. Over time, it traps dust, harbor bacteria, and can actually degrade your cabinet finish if left untreated.
The good news is that you don’t need expensive specialists or harsh industrial solvents. With the right cleaner, a little technique, and some patience, you can bring even the grimiest cabinets back to life. I’ve tested more methods than I care to count in my own kitchen — from white vinegar sprays to dish soap scrubs to commercial degreasers — and some work far better than others depending on the type of grease buildup and the cabinet material you’re dealing with.
In this guide, I’ll walk you through the most effective approaches for different situations, help you choose the best product for your specific cabinets, and share the mistakes I see people make that can actually make the problem worse. Whether you’re doing a weekly wipe-down or tackling years of buildup, there’s a solution here that will work.
Why Grease Builds Up on Kitchen Cabinets
Every time you cook — sautéing onions, frying eggs, simmering a sauce — tiny particles of oil and moisture become airborne. These particles settle on every nearby surface, including your cabinet doors and frames. The cabinets closest to the stove get the worst of it, but even cabinets across the kitchen accumulate a surprising amount over weeks and months. The heat from cooking also speeds up the bonding process, essentially baking that grease into your cabinet finish.
This is why the best way to remove kitchen grease is to act before it fully hardens. Fresh grease — within a day or two of cooking — wipes off easily with a damp cloth. Old grease that’s been there for months requires far more effort, stronger cleaners, and more scrubbing. The older and thicker the buildup, the more likely you are to accidentally damage the cabinet surface if you use the wrong approach.
According to the FDA’s food safety guidelines, kitchen surfaces — including cabinet fronts — are a common area for grease-related bacterial buildup. Regular degreasing isn’t just cosmetic; it’s a hygiene issue.
The type of cooking you do also matters significantly. Households that frequently deep-fry or cook with large amounts of oil will see grease buildup far faster than those who mostly steam or bake. If you have an older or underpowered range hood, that lack of ventilation means more airborne grease particles are landing on your surfaces. Pairing a good cleaning routine with the right cleaning gadgets makes a significant difference in keeping things manageable.
The Best Way to Remove Grease From Kitchen Cabinets
After trying everything from baking soda pastes to commercial degreasers, I can say with confidence that the best way to remove grease from kitchen cabinets involves a two-phase approach: loosen first, then lift. Trying to scrub hardened grease without loosening it first is where most people go wrong — and it’s where cabinet damage happens.
How Do You Remove Grease From Kitchen Cabinets Step by Step?
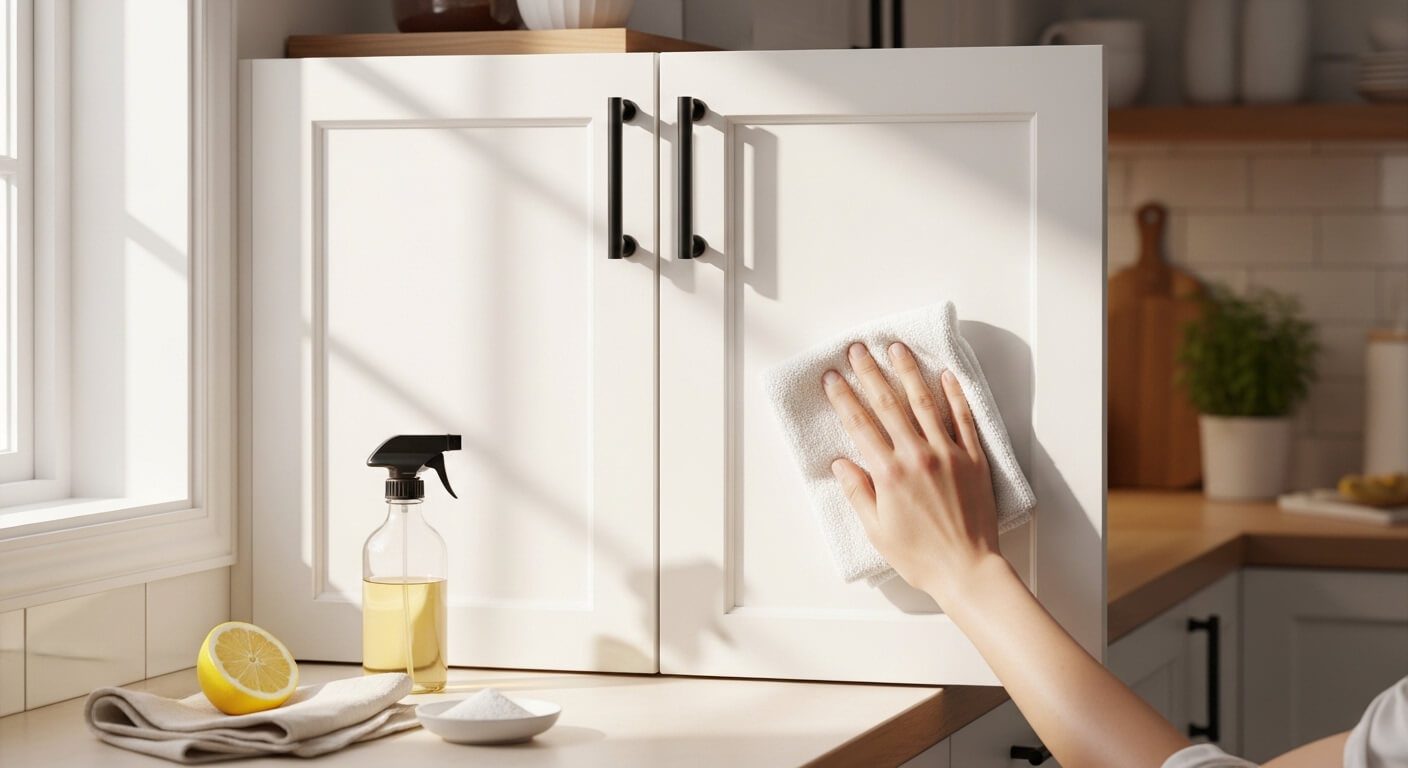
Start by mixing a solution of equal parts warm water and white vinegar — one of the most underrated and effective degreasers for light to moderate buildup. Spray it generously onto the greasy surface and let it sit for 3 to 5 minutes. This dwell time is critical; it gives the acid in the vinegar time to break down the grease bonds before you touch it. Then take a soft microfiber cloth and wipe in circular motions, starting from the top of the cabinet door and working downward.
For heavier grease buildup, dish soap is your best friend. Dawn or similar degreasing dish soaps are specifically formulated to cut through cooking oils. Add two to three drops to a bowl of warm water, soak your cloth, and wring it out so it’s damp but not dripping. Wipe the greasy areas, applying gentle pressure. For corners and crevices, an old soft-bristled toothbrush works perfectly without scratching the surface.
Always work from top to bottom when cleaning cabinets. Grease drips down as you loosen it, and if you start at the bottom, you’ll just be re-soiling areas you’ve already cleaned. Use a second dry cloth to buff as you go — this prevents streaking and removes any residue before it re-hardens.
After cleaning, always do a final wipe with a clean damp cloth and then immediately dry the surface. Leaving cleaning solution on wood or painted cabinets can cause swelling, discoloration, or peeling over time. A good set of high-quality microfiber cloths makes this process much more effective than paper towels, which tend to leave lint and don’t absorb as well.
Best Product to Remove Grease From Kitchen Cabinets
The market is flooded with kitchen degreasers, and honestly, not all of them are created equal. The best product to remove grease from kitchen cabinets depends on two things: how heavy the buildup is and what material your cabinets are made from. Using the wrong product on the wrong surface can strip finishes, dull paint, or even warp wood — so it’s worth knowing your options.
For everyday maintenance and mild grease, a simple diluted white vinegar solution or dish soap and water is genuinely the most effective and safest option. It costs almost nothing and works beautifully on painted, laminate, and most wood cabinets. This is where the best way to remove kitchen grease is also the most economical one — you likely already have everything you need.
For moderate to heavy buildup, a commercial degreaser like EPA Safer Choice-certified products such as Method Heavy Duty Degreaser or Krud Kutter offers more cutting power while being safer for your family and the environment. These are especially useful if you’re doing a deep clean after months of neglect. If you care about sustainability, there are excellent eco-friendly cleaning products that perform just as well without the harsh chemicals.
Always test any new cleaner on an inconspicuous spot first — inside a cabinet door or on the back panel. This 30-second step can save you from accidentally stripping your cabinet finish. Even “gentle” commercial cleaners can react badly with certain finishes or stains.
Baking soda paste is another option worth having in your arsenal, specifically for stubborn localized grease spots. Mix 3 parts baking soda with 1 part water to form a thick paste, apply it to the greasy area, let it sit for 10 minutes, and then gently scrub with a soft cloth. The mild abrasiveness of the baking soda helps lift the grease without scratching most surfaces. Rinse thoroughly afterwards.
Best Cleaner to Remove Grease From Kitchen Cabinets by Cabinet Type
One of the most overlooked aspects of cabinet cleaning is that different materials require different approaches. What works wonderfully on a painted MDF cabinet can be disastrous on raw wood or glass-fronted cabinets. Here’s a breakdown of the best cleaner to remove grease from kitchen cabinets for each common type.
How Do You Remove Grease From Kitchen Cabinets Made of Wood?
Natural wood cabinets — whether stained, sealed, or oiled — are the most sensitive to cleaning chemicals and excess moisture. For these, diluted dish soap (a few drops in warm water) is the safest and most effective choice. Avoid vinegar on untreated or oiled wood, as the acidity can slowly break down the wood’s natural oils and cause drying or discoloration over time. After cleaning, dry immediately and consider applying a small amount of wood polish or conditioner to restore any lost moisture. Never let water pool or sit on natural wood cabinets — even for a few minutes.
For painted wood cabinets, the approach is slightly more forgiving. A diluted all-purpose cleaner or dish soap solution works well, and white vinegar diluted to 50/50 with water is generally safe for painted surfaces. Avoid abrasive scrubbers completely — even on tough grease spots — as they will scratch and dull the paint finish. A soft cloth and a little patience beats a scratched cabinet every time.
Laminate and thermofoil cabinets are the most forgiving of all. These can handle slightly stronger cleaners and even diluted commercial degreasers without issue. Just avoid anything that contains acetone or strong solvents, which can lift the laminate or cause the thermofoil to bubble and peel.
Never use steel wool, magic erasers, or abrasive scrubbing pads on any cabinet surface, including laminate. Despite being marketed as “gentle,” magic erasers are actually a very fine abrasive that can dull glossy finishes, remove paint, or create micro-scratches that trap future grease and dirt even more readily.
How to Remove Grease From Kitchen Walls
The techniques for how to remove grease from kitchen walls are very similar to cabinets, with a few important differences. Walls have more surface area and are typically painted — often with standard emulsion paint that can be more delicate than the factory-applied finish on your cabinet doors.
How to Remove Grease From Kitchen Walls Without Damaging Paint?
The safest approach for painted kitchen walls is a warm water and dish soap solution, applied with a soft sponge and wiped gently. Avoid scrubbing in circular motions on flat paint finishes, as this can create visible “burnish marks” — shiny patches where the paint has been polished by friction. Instead, use light up-and-down strokes. For walls painted with semi-gloss or satin finish (which is common in kitchens precisely because they’re more cleanable), you have more flexibility. A diluted white vinegar solution works well and rinses cleanly.
For the heavily splattered zone directly behind the stove, which can accumulate months of cooking residue, a commercial kitchen degreaser is often the most practical solution. Spray it on, allow it to dwell for the recommended time, and wipe away. Follow immediately with a clean damp cloth to remove all residue, and then dry the wall completely. Leaving any cleaning product residue on painted walls can cause the paint to soften or peel over time.
If your kitchen walls have wallpaper — even vinyl-coated wallpaper that seems durable — be very careful with any liquid cleaner. Test in a hidden area first and keep moisture to an absolute minimum. Grease on wallpaper is best addressed immediately when fresh; old, set-in grease on wallpaper can be very difficult to remove without damage.
Does WD-40 Remove Grease From Kitchen Cabinets?
This is a surprisingly common question, and the answer is: yes, WD-40 can remove grease from kitchen cabinets — but it’s not the best choice for most situations. WD-40 works on the “like dissolves like” principle: it’s an oil-based product, and oils can help break down and shift other oil-based substances like cooking grease. Some people swear by it for stubborn, caked-on grease that other methods can’t shift.
The problem is that WD-40 leaves its own oily residue behind, which then needs to be removed with a degreaser or dish soap anyway. So you’re essentially creating a two-step process that doesn’t save you much effort. Additionally, on painted or finished wood surfaces, the petroleum-based components in WD-40 can potentially dull or discolor certain finishes, especially matte or flat paint. If you do use it, apply a tiny amount to a cloth rather than spraying directly on the cabinet, and follow up with a thorough cleaning immediately afterward.
In my experience, baking soda paste or a good commercial degreaser handles even very stubborn grease more cleanly and with less collateral risk to the cabinet surface. Save the WD-40 for squeaky hinges.
If you’re dealing with ancient, built-up grease that nothing seems to shift, try applying warm (not hot) water with a few drops of dish soap and placing a warm damp cloth over the area for 5 minutes. The gentle heat and moisture together will begin to soften even very old grease, making it dramatically easier to wipe away without aggressive scrubbing.
Cost Breakdown: Budget vs. Premium Cleaning Options
Here’s a realistic look at what you can expect to spend for different levels of cabinet cleaning, from the completely DIY approach to bringing in store-bought heavy artillery.
| Option | Budget (DIY) | Mid-Range | Premium |
|---|---|---|---|
| Cleaning Solution | White vinegar + dish soap — under $2 | All-purpose degreaser spray — $5–$10 | Enzyme-based or eco-certified degreaser — $12–$20 |
| Applicator / Cloth | Old cotton T-shirt or basic cloths | Pack of microfiber cloths — $8–$15 | Premium microfiber cleaning set — $20–$35 |
| Scrubbing Tool | Old soft toothbrush | Soft-bristle cleaning brush — $6–$10 | Detail cleaning brush set — $15–$25 |
| Cabinet Polish / Protector | Mineral oil (natural wood only) — $3 | Wood cleaner + conditioner — $8–$15 | Cabinet restoration kit — $25–$40 |
| Total Estimated Cost | $2–$8 | $27–$50 | $72–$120 |
For most households, the budget approach is genuinely all you need if you’re cleaning regularly (every 2–4 weeks). The mid-range setup makes sense if you’re doing a more thorough quarterly clean or dealing with tougher buildup. The premium options are worth considering if you have high-end cabinetry that you want to maintain in pristine condition over the long term.
Common Mistakes When Removing Kitchen Cabinet Grease
Even with the best intentions, there are several things that can go wrong — and some of them can cause more damage than the grease itself. Here are the mistakes I see most often, and how to avoid them.
Using too much water. This is the number one mistake, especially on wood cabinets. Excess moisture seeps into seams and joints, causes swelling, and can lead to warping or delamination over time. Always use a damp cloth, never a soaking wet one, and dry immediately after cleaning.
Skipping the dwell time. Spraying cleaner and immediately wiping it off gives the solution almost no time to work. Most degreasers need at least 2–5 minutes of contact time to effectively break down grease. Spray, wait, then wipe — you’ll use less elbow grease and get better results.
Using harsh abrasives. Steel wool, rough sponges, or even slightly abrasive cloths will scratch most cabinet finishes. Once scratched, those micro-abrasions become traps for future grease and grime. Always use soft microfiber or cotton cloths.
Forgetting the hardware. Cabinet knobs and handles accumulate just as much grease as the cabinet surfaces themselves — sometimes more, because they’re touched constantly with cooking-soiled hands. Clean these separately with a toothbrush and dish soap, or remove them and soak briefly in warm soapy water.
Mixing cleaners. Never mix vinegar with baking soda in the hope of getting a “stronger” cleaner — the acid-base reaction just produces water and CO₂, wasting both products. More importantly, never mix bleach with any other cleaning product. Stick to one cleaner at a time and rinse thoroughly between if you switch.
The remove grease from kitchen cabinets process is as much about technique as it is about the product you choose. A mediocre cleaner used with good technique — dwell time, soft cloths, immediate drying — will outperform an excellent cleaner used sloppily every single time.
Keeping Cabinets Grease-Free: Long-Term Maintenance
The best way to deal with cabinet grease is to prevent heavy buildup from happening in the first place. A quick weekly wipe-down of the cabinet fronts closest to your stove — taking about 5 minutes — is infinitely easier than a deep clean every few months. Keep a spray bottle of diluted dish soap or vinegar solution under the sink and make it part of your after-cooking routine.
Improving your kitchen’s ventilation is the most impactful long-term move. If your range hood is undersized or underpowered for your cooking style, upgrading it — or at the very least cleaning and replacing the filters regularly — will dramatically reduce how much grease ends up on your cabinets in the first place. According to the U.S. Department of Energy’s kitchen ventilation guidance, a well-functioning range hood reduces indoor air pollutants and grease particles by a significant margin.
For wood cabinets specifically, applying a thin coat of furniture wax or cabinet protector after a deep clean creates a barrier that makes future grease easier to wipe off. The grease sits on top of the wax rather than bonding with the cabinet finish. This is one of the tips that experienced home keepers know that most people don’t — it’s a game changer for high-traffic kitchens.
If you want to take your kitchen maintenance to a more systematic level, a good selection of dedicated cleaning gadgets can make the whole process faster and more consistent. Steam cleaners, in particular, are excellent at loosening grease from cabinet surfaces and hardware without any chemicals — something worth considering if you have young children or pets at home. You might also find useful inspiration in our guide to eco-friendly cleaning products that won’t compromise indoor air quality while you cook.
Finally, consider doing a full cabinet audit seasonally — once in spring and once before the holiday cooking season in autumn. Check the backs of doors, the tops of upper cabinets (which accumulate grease but are rarely cleaned), and the inside edges of frames. A thorough clean twice a year, combined with regular maintenance wipes in between, is all most kitchens need to stay in great condition for the long term. For broader home organization and maintenance strategies, the ideas in our home cleaning and maintenance guides pair well with what we’ve covered here.
Frequently Asked Questions
How to remove grease from kitchen cabinets without damaging the finish?
The safest approach is always to start with the mildest effective cleaner and work your way up only if needed. A solution of warm water with a few drops of dish soap is gentle enough for virtually all cabinet finishes, including painted wood, laminate, and thermofoil. Apply with a soft microfiber cloth, allow a brief dwell time of 2–3 minutes, then wipe gently without scrubbing. Dry the surface immediately after cleaning to prevent moisture from penetrating seams or causing paint to lift. Always test any new cleaner in an inconspicuous spot before applying it to visible surfaces — this single step can prevent costly finish damage.
How do you remove grease from kitchen cabinets using natural cleaners?
White vinegar diluted 50/50 with warm water is one of the most effective natural degreasers available, working well on painted, laminate, and glass surfaces. For tougher buildup, a paste made from baking soda and a small amount of water can be applied directly to the greasy area, left for 5–10 minutes, and then wiped clean — the mild abrasive action of the baking soda helps lift the grease without scratching. Dish soap, while not strictly “natural,” is biodegradable and food-safe, making it another excellent option. Avoid using undiluted vinegar on natural wood or stone surfaces, as the acidity can cause long-term damage to these materials.
How to remove grease from kitchen cabinets that have years of buildup?
Old, thick grease buildup requires more aggressive treatment, but you still need to proceed carefully to protect the cabinet surface. Start by applying a commercial degreaser (like Krud Kutter or a similar product) and allowing it to dwell for the maximum recommended time — usually 5–10 minutes. For extremely thick deposits, you may need to apply the product and then lay a warm damp cloth over it for another 5 minutes to further soften the grease. Work in small sections rather than trying to tackle the whole cabinet at once, using a soft brush for edges and a microfiber cloth for flat surfaces. Stubborn spots may require two or three applications — patience beats aggressive scrubbing every time.
How do you remove grease from kitchen cabinets made of wood without water damage?
The key with natural wood cabinets is to use as little liquid as possible. Wring your cloth out thoroughly so it is barely damp — there should be no dripping. Apply a diluted dish soap solution (not vinegar, which can dry out wood over time), work in the direction of the wood grain, and immediately follow with a dry cloth to absorb all moisture. Never let any standing water remain on wood surfaces for more than a few seconds. After cleaning, consider applying a thin coat of mineral oil or wood conditioner to replenish any moisture lost during cleaning and to create a protective barrier against future grease buildup.
How to remove grease from kitchen walls behind the stove?
The area directly behind the stove is typically the most heavily contaminated zone in any kitchen and often requires a dedicated commercial degreaser rather than DIY solutions alone. Spray the degreaser generously on the wall surface, allow it to work for the recommended dwell time, and wipe with a soft cloth or non-scratch sponge in gentle up-and-down strokes. For painted walls, avoid circular scrubbing motions which can create burnish marks. Rinse thoroughly with a clean damp cloth and dry completely. If you cook frequently with high heat or oil, consider installing a backsplash or splatter guard behind your stove — it’s a simple upgrade that dramatically reduces wall contamination.
Does WD-40 remove grease from kitchen cabinets effectively?
WD-40 can technically dissolve cooking grease because it is oil-based and works on the principle that like dissolves like. However, it leaves behind its own petroleum-based residue that then needs to be removed with dish soap or a degreaser, making it a two-step process rather than a time-saver. On certain cabinet finishes — particularly matte or flat painted surfaces — WD-40 can cause dulling or discoloration. If you decide to use it on a stubborn spot, apply it to a cloth rather than directly onto the cabinet, use the minimum amount necessary, and follow up immediately with a thorough cleaning using dish soap and warm water to remove all the oily residue.
What is the best product to remove grease from kitchen cabinets quickly?
For speed and effectiveness, a commercial kitchen degreaser is the best product to remove grease from kitchen cabinets when you’re dealing with anything beyond light buildup. Products that are labeled as “heavy duty degreaser” or “kitchen degreaser” are specifically formulated to cut through cooking oils and fats quickly. For everyday maintenance, however, dish soap and warm water or a diluted white vinegar solution are fast, cost-effective, and safe for regular use. The “best” product ultimately depends on the severity of the buildup — matching your cleaner to your situation is more important than always reaching for the strongest option.
How often should you clean kitchen cabinets to prevent grease buildup?
A quick wipe of the cabinet fronts closest to the stove should ideally happen weekly, or after any particularly splashy cooking session. This light maintenance cleaning takes only 5–10 minutes and prevents grease from bonding deeply with the cabinet surface. A more thorough cleaning of all cabinet surfaces — including tops, frames, and hardware — should be done monthly or every 6–8 weeks, depending on how much cooking your household does. Twice a year, do a full deep clean that includes the inside edges of cabinet frames and the tops of upper cabinets, which accumulate grease and dust that is rarely addressed in routine cleaning.
Conclusion
Greasy kitchen cabinets are one of those problems that compound over time — a little ignored buildup today becomes a stubborn, sticky mess months from now. But now you have everything you need: the right cleaners for each cabinet type, the correct technique for different levels of buildup, and the maintenance habits that keep grease from taking over in the first place. Whether your go-to solution ends up being white vinegar and dish soap or a commercial degreaser, the most important variables are dwell time, soft cloths, and immediate drying.
If this article has you thinking about the broader state of your kitchen’s cleanliness, there’s plenty more to explore. Tackling kitchen organization — including the inside of those cabinets, not just the outside — can transform how the whole space feels and functions. Similarly, if you’ve been meaning to look into what tools and products genuinely move the needle for kitchen and home maintenance, our guides on cleaning hacks with vinegar and eco-friendly cleaning products are great next reads. Clean cabinets are just the beginning of a kitchen that truly feels like a place you’re proud of.