
DIY Moss Wall Art: A Beginner’s Guide to Preserved Greenery
There is something quietly transformative about bringing nature indoors — and DIY moss wall art sits right at the intersection of that impulse and genuine creative expression. Whether you are drawn to the velvety texture of sheet moss or the sculptural drama of preserved reindeer moss, crafting your own preserved moss decor panel is one of the most rewarding weekend projects a beginner can take on. No green thumb required. No watering schedule to remember. Just a little patience, a few accessible materials, and a blank wall that is begging for something beautiful.
The appeal of maintenance-free indoor plants has surged in recent years, and it is easy to understand why. Modern life rarely leaves room for the careful tending that living plants demand, yet the psychological benefits of greenery — reduced stress, improved focus, a general sense of calm — remain just as desirable. Preserved moss bridges that gap elegantly. It retains its color and texture for years, requires zero watering or sunlight, and carries none of the guilt of a neglected potted fern wilting on a shelf.
In my experience, the first moss panel I ever made took about three hours from start to finish, cost less than forty dollars, and instantly became the most-commented-on element in my entire living room. Guests assumed it was a high-end boutique purchase. What follows is everything I wish someone had told me before I started — from choosing the right moss varieties to avoiding the rookie mistakes that send first-timers back to square one.
Why Moss Wall Art Is Having a Moment
The rise of biophilic design — the practice of integrating natural elements into built environments — has fundamentally shifted how interior designers and homeowners approach wall decor. Research consistently shows that exposure to natural textures and organic forms reduces cortisol levels and promotes a sense of wellbeing. Moss, with its dense, tactile surface and deep earth tones, delivers that biophilic hit in a way that printed botanical posters simply cannot replicate.
What makes moss particularly compelling as a design material is its versatility. A single panel of flat sheet moss in a slim black frame reads as minimalist and modern. A layered composition mixing multiple moss types and air plants leans maximalist and bohemian. The same base material, radically different outcomes — that flexibility is rare in the world of wall art. Interior designers have caught on, and so has the Pinterest algorithm. Searches for botanical wall art and preserved greenery installations have climbed steadily, driven in large part by the visual-first logic of platforms like Instagram and TikTok where texture photographs exceptionally well.
There is also an honest sustainability angle worth considering. Preserved mosses sold by reputable suppliers are harvested in accordance with responsible forestry practices, then treated with non-toxic glycerin solutions that lock in their appearance without the need for ongoing resources like water, fertilizer, or grow lights. For anyone trying to reduce their household’s environmental footprint, a moss panel is a far more conscious choice than the plastic faux-foliage alternatives lining big-box store shelves.
Preserved moss is treated with a glycerin and water solution that replaces the plant’s natural moisture, keeping it soft, flexible, and vibrant for three to eight years without any water or sunlight.
Tools & Materials You Will Need
One of the genuine pleasures of this project is how approachable the supply list is. You do not need a craft room full of specialist equipment. Most items are available at craft stores, garden centers, or online, and several you likely already own.
Moss Varieties to Consider
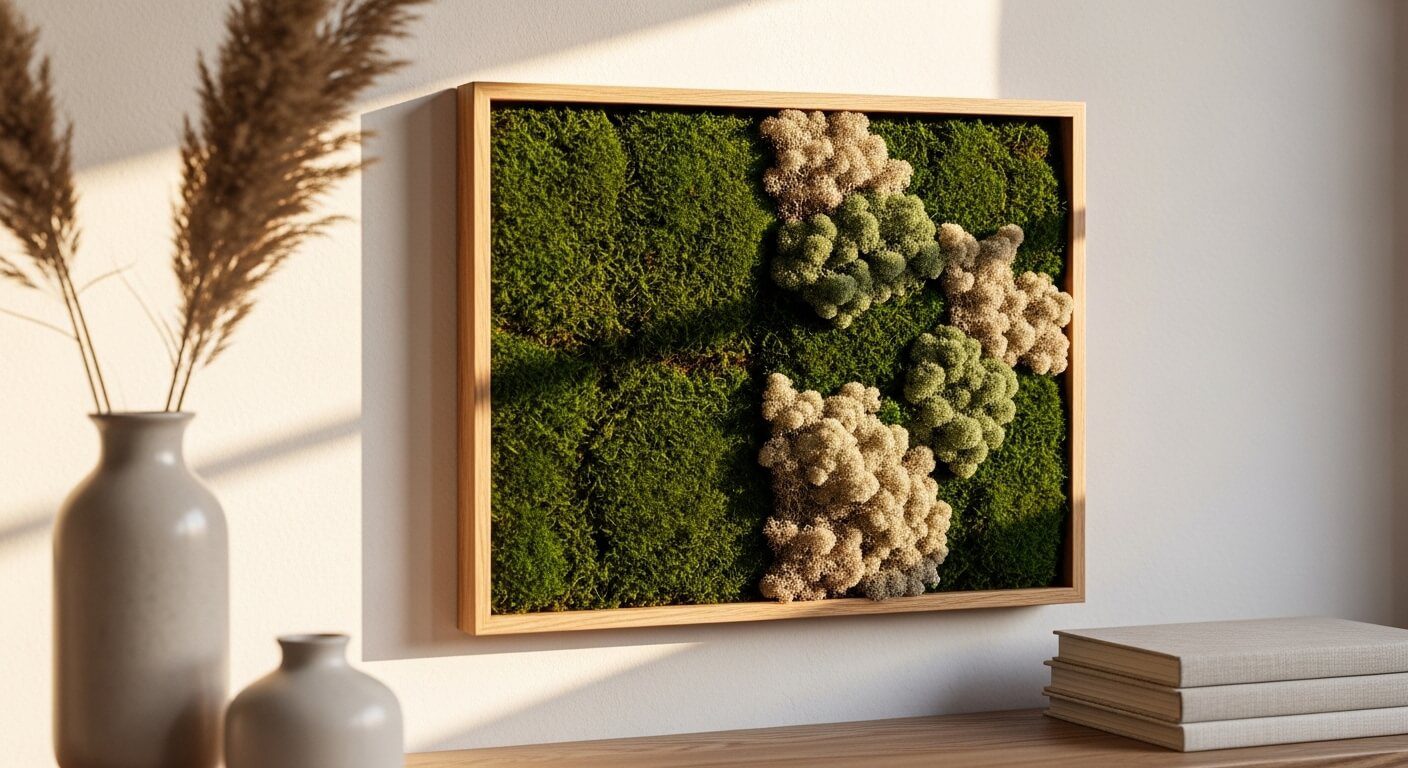
The three most beginner-friendly preserved moss types are flat sheet moss, reindeer moss, and bun moss. Sheet moss is your workhorse — it covers large areas quickly and creates a lush, carpet-like base. Reindeer moss (also called caribou moss) comes in a spectacular range of dyed colors and adds visual texture and dimension. Bun moss, with its rounded, cushion-like clusters, is perfect for adding three-dimensional interest to any composition. For a first project, I recommend starting with a sheet moss base and accenting with one or two small patches of reindeer moss in a complementary color.
Complete Materials List
- Preserved sheet moss (enough to cover your chosen frame or backing)
- Preserved reindeer moss or bun moss for accents
- A wooden frame, shadow box, or plywood backing board
- Hot glue gun and plenty of glue sticks
- Craft scissors or small pruning shears
- Ruler and pencil for planning your layout
- Sandpaper (if using raw wood)
- Optional: wire, floral picks, or preserved air plants for added texture
- Optional: spray sealant for extra longevity
- Wall mounting hardware appropriate for your frame weight
Buy your preserved moss from a specialist supplier rather than a general craft store. Specialist moss tends to be fresher, more pliable, and far less prone to shedding. Check that the product description explicitly says “preserved” rather than “dried” — dried moss is brittle and will crumble under a hot glue gun.
Cost Breakdown: Budget to Premium
One of the most common questions beginners ask is how much a moss wall art project actually costs. The honest answer is: it depends enormously on the size of your panel and the quality of materials you choose. The table below breaks down realistic cost ranges across three tiers so you can plan accordingly.
| Item | Budget (Under $40) | Mid-Range ($40–$90) | Premium ($90–$200+) |
|---|---|---|---|
| Preserved Sheet Moss | Small bag, ~1 sq ft | Medium bundle, ~3 sq ft | Large bulk pack, 6+ sq ft |
| Accent Moss (Reindeer/Bun) | Single color, small pack | 2–3 colors, medium packs | Full spectrum, bulk variety |
| Frame / Backing | Repurposed frame or plywood | Shadow box from craft store | Custom wood frame or canvas |
| Adhesive & Tools | Basic hot glue gun | Heavy-duty glue gun + sticks | Professional floral adhesive |
| Extras | None | Air plants or dried flowers | LED backlighting, engraving |
| Total Estimate | $15 – $38 | $45 – $85 | $95 – $220+ |
For a first project, the mid-range tier offers the best balance of quality and affordability. You get enough material variety to create something genuinely striking without the investment anxiety that can make the process feel high-stakes.
Step-by-Step: How to Make Your Moss Wall Art
The process is more forgiving than most beginners expect. There is no precise technique that demands years of practice — just a clear sequence to follow, and the confidence to trust your own aesthetic instincts as you go.
Step 1: Prepare Your Backing
Start with a clean, dry surface. If you are using a raw plywood board, lightly sand it and wipe away any dust. If you are using a purchased frame or shadow box, remove the glass — you will not need it, and it adds unnecessary weight. If your backing is very light in color and you plan to leave any areas exposed as negative space, consider painting it a deep forest green or matte black first. This prevents any jarring flashes of pale wood peeking through your moss arrangement.
Step 2: Plan Your Composition
Do not skip this step. Lay your moss pieces directly on the backing without any glue first, and take a photo with your phone. Stand back and look at the image. Assess the balance of textures, colors, and visual weight. Make adjustments. This dry-run stage saves enormous frustration later, because once glue is involved, repositioning becomes genuinely messy. Aim for an arrangement that feels intentional but not rigid — organic asymmetry almost always looks more natural than perfect symmetry.
Step 3: Glue the Base Layer
Working in small sections, apply hot glue directly to the backing and press your sheet moss firmly in place. Hold each section for ten to fifteen seconds to ensure a solid bond. Work from the center outward, or from one edge across — whichever method helps you maintain your planned composition. Do not panic if small pieces of moss shed during this process; that is normal, and you can fill gaps later.
Step 4: Add Accent Layers
Once your base layer is complete, begin adding your accent mosses. Reindeer moss clusters look best when pressed gently into gaps or layered slightly over the sheet moss edges. Bun moss can be glued directly onto the sheet moss surface to create raised, three-dimensional focal points. Step back frequently to assess the overall composition. Add sparingly — it is far easier to add more than to remove what has already been glued.
Step 5: Fill Gaps and Refine
Use small offcuts and loose moss pieces to fill any visible gaps or bare patches on the backing. A pair of small scissors is invaluable here for trimming pieces to precise sizes. Once you are satisfied with the coverage and composition, allow the entire panel to rest flat for at least two hours before hanging. This gives all the glue bonds time to cure fully.
Step 6: Mount and Display
Use appropriate wall hardware for the weight of your finished panel. Larger pieces benefit from two hanging points rather than one to prevent tilting. Choose a location away from direct sunlight and high-humidity environments like bathrooms — both can accelerate color fading in preserved moss over time.
The dry-layout stage — arranging your moss without glue first — is the single most impactful step for a polished final result. Professionals spend as much time planning as executing. Give yourself permission to rearrange as many times as needed before committing to adhesive.
Design Styles and Composition Tips
The beauty of moss wall art is that it adapts to virtually any interior aesthetic. Understanding a few basic compositional principles, borrowed from the world of fine art and graphic design, can dramatically elevate the sophistication of your finished piece.
Minimalist Approach
For a minimalist result, constrain yourself to a single moss type — flat sheet moss is ideal — within a simple geometric frame. A square panel in a thin black metal frame, mounted against a white wall, makes a statement through restraint. The richness of the moss texture does all the visual work. This approach pairs exceptionally well with Scandinavian and Japanese-inspired interiors.
Maximalist Approach
If your space leans maximalist, embrace variety. Mix four or five moss types and colors, incorporate preserved ferns, dried seed pods, or even small pieces of driftwood. Work on a large backing — at least 24 by 36 inches — and treat the composition like a landscape painting, with foreground, midground, and background elements creating visual depth. Spaces that celebrate biophilic interior design ideas tend to welcome this kind of layered, gallery-worthy installation. For more inspiration on weaving nature through every corner of your home, explore our guide to biophilic interior design ideas at CraftsnComforts.com.
Typography and Lettering Panels
One of the most popular current trends is creating moss letter or word panels — framing a single initial, a short word like “HOME” or “GROW,” or even a simple geometric shape like a heart or circle, filled entirely with moss against a contrasting dark backing. These panels work beautifully as personalized gifts and photograph exceptionally well. You can cut letter templates from cardboard and use them as guides for shaping your moss application.
Common Mistakes Beginners Make
Having made most of these errors myself and watched others navigate them too, I can say with confidence that awareness is the most effective prevention. None of these mistakes are fatal to a project, but all of them are frustrating and avoidable.
Using Dried Moss Instead of Preserved Moss
This is the most common and most consequential error. Dried moss looks similar in product listings but behaves completely differently — it is brittle, prone to crumbling, sheds aggressively, and has none of the soft, tactile quality that makes preserved moss so appealing. Always read product descriptions carefully and confirm the moss has been preserved with glycerin. If it does not say preserved, assume it is not.
Applying Too Much Hot Glue
Excess hot glue creates visible strings and blobs that show through the moss and look unprofessional. Apply glue in small dots or thin lines, and work quickly — hot glue sets in seconds. If strings do form, they can usually be removed once fully cool by gently rubbing with your fingers.
Ignoring Wall Placement
Preserved moss does not thrive near direct sunlight or high humidity. A bathroom wall or a south-facing window ledge will accelerate color fading significantly. Position your panel in indirect light for the longest possible lifespan.
Rushing the Composition Stage
The impulse to start gluing immediately is understandable — you are excited, the materials are spread out in front of you, and the project feels urgent. Resist it. Every professional moss artist spends substantial time in the planning stage. Your future self will thank you for the extra twenty minutes of dry-laying and photographing before any adhesive is involved.
Never use spray paint directly on preserved moss to change its color after the fact. The solvents in standard spray paints can dissolve the glycerin treatment and cause the moss to become brittle and begin shedding within weeks. If you want a specific color, purchase pre-dyed preserved moss from your supplier.
Longevity & Maintenance of Preserved Moss
The remarkable thing about a well-made preserved moss panel is how little it asks of you after it is on the wall. This is the core appeal of maintenance-free indoor plants as a category — and preserved moss is perhaps the purest expression of that philosophy. No watering. No fertilizing. No grow lights. No seasonal repotting. It simply exists, looking consistently beautiful, for years.
That said, a small amount of periodic attention will meaningfully extend the lifespan and visual quality of your panel. According to University of Maryland Extension resources on moss cultivation, even preserved botanical materials benefit from occasional attention to environmental conditions.
Expected Lifespan
A quality preserved moss panel, kept away from direct sunlight and humidity extremes, will maintain its color and texture for three to eight years. The glycerin treatment that replaces the plant’s natural moisture is remarkably durable under normal indoor conditions. Panels in consistently dry climates may benefit from an occasional very light misting of water on the moss surface — not enough to wet the backing, just enough to restore a degree of pliability if the moss begins to feel unusually stiff or brittle.
Cleaning and Dust Management
Dust will accumulate on any textured surface over time, and moss is no exception. The most effective removal method is a can of compressed air, held at a distance of at least twelve inches, used to gently blow dust from the surface. Avoid vacuum cleaners with suction attachments, which can dislodge moss pieces from the backing. A very soft, dry paintbrush can also be effective for light surface dusting.
Color Preservation
UV exposure is the primary enemy of preserved moss color. Even indirect light through a window contains UV radiation sufficient to gradually bleach the pigmentation from moss over time. For panels in rooms with significant natural light exposure, repositioning the panel every few months to equalize any fading, or installing UV-filtering window film, can substantially extend the color vibrancy of your piece. This is a principle well-documented in museum conservation practice — light management is the single most impactful factor in the longevity of any displayed organic material.
Repairs and Touch-Ups
If a section of moss becomes dislodged — typically from a glue bond failure rather than any moss degradation — it is entirely repairable. Simply reapply hot glue or a craft adhesive to the backing and press the moss back in place. Keep a small amount of leftover moss from your original project in a sealed bag for exactly this eventuality. Color-matching a replacement moss piece from a different batch is surprisingly difficult, so preserved offcuts from your original materials are genuinely valuable.
Frequently Asked Questions
textDoes DIY moss wall art require any maintenance?
Preserved moss wall art is essentially maintenance-free. It requires no watering, no sunlight, and no fertilizing. Occasional light dusting with compressed air or a soft paintbrush is all that is needed to keep the panel looking its best. In very dry climates, an extremely light misting of water on the moss surface every few months can help maintain pliability, but this is optional rather than necessary.
How long does preserved moss wall art last?
A well-made preserved moss panel kept in appropriate indoor conditions — away from direct sunlight and high humidity — will typically maintain its color and texture for three to eight years. The glycerin preservation treatment is highly durable under normal indoor conditions. Panels exposed to direct sunlight or significant humidity fluctuations will fade or degrade more quickly.
What type of moss is best for beginners?
Flat sheet moss is the most beginner-friendly option. It covers large areas quickly, adheres well to hot glue, and creates a rich, carpet-like base texture. For accent interest, preserved reindeer moss is an excellent second material — it comes in a wide range of colors and adds visual dimension without requiring precise application technique.
Can I make moss wall art without a hot glue gun?
Yes, though hot glue is by far the most convenient adhesive for this project. Alternatives include floral adhesive, PVA craft glue, or a strong multi-purpose adhesive. The disadvantage of non-hot-glue adhesives is longer drying times, which means you need to hold each moss piece in place longer or use pins as temporary supports during drying. Hot glue’s fast set time makes the process significantly more efficient.
Is preserved moss safe for homes with pets or children?
Preserved moss is generally considered non-toxic, as the glycerin used in the preservation process is a substance also found in many food and personal care products. However, moss is not intended for consumption, and some dyed varieties may use colorants that are not food-safe. Mounting panels out of reach of curious pets and young children is the most practical precaution.
Where should I place my moss wall art in my home?
The ideal location is a wall that receives indirect natural light or ambient room light, with stable temperature and humidity levels. Avoid direct sunlight, which causes color fading, and avoid high-humidity environments like bathrooms or kitchens near steam sources, which can compromise the glycerin preservation over time. Living rooms, home offices, bedroom feature walls, and entryways are all excellent choices.
How much does it cost to make a moss wall art panel?
Costs vary with size and material quality. A small beginner panel using budget materials can cost as little as fifteen to thirty-eight dollars. A mid-range project with a quality shadow box frame and a variety of moss types typically falls between forty-five and eighty-five dollars. Large-format or premium installations with custom framing and additional botanical elements can reach two hundred dollars or more.
Can I add other elements like air plants or dried flowers to my moss panel?
Absolutely — this is one of the most effective ways to add visual interest and depth to a moss panel. Preserved air plants, dried seed pods, small pieces of driftwood, preserved fern fronds, and dried flowers all integrate beautifully with moss. Secure these elements with hot glue or floral wire, and consider them during your dry-layout planning stage to ensure they are incorporated intentionally rather than added as afterthoughts.
Conclusion
Creating your own DIY moss wall art is one of those rare projects where the process is as satisfying as the result. You begin with a bare frame and a pile of botanical material, and you end with something genuinely personal — a piece of living-looking art that carries your decisions in every textured inch of its surface. The skills involved are accessible to any beginner willing to take the planning stage seriously, and the materials are affordable enough that experimentation feels low-risk.
The broader appeal of preserved moss decor lies in what it represents: a meaningful engagement with the natural world that fits within the real constraints of contemporary life. Not everyone can maintain a garden. Not everyone has the time or light conditions for houseplants. But almost anyone can hang a moss panel — and feel, every time they look at it, that small but genuine lift that comes from having something alive and green nearby. Biophilic interior design ideas like this one are not just aesthetic trends; they are responses to a genuine human need for connection with nature, expressed through the materials and spaces we inhabit every day.
Start small, trust your instincts, take the planning stage seriously, and do not be surprised when your first panel turns out better than you expected. It almost always does.